Wednesday, 21 December 2011

Starting to lose my mind

Last night my lovely, and very tolerant, housemate gave me a nice homemade Christmas card and some lovely homemade Christmas biscuits; and it suddenly occurred to me that I hadn't made her anything for Christmas.  I am a bad person.

I can't face making up more of anything that I have made already and she's seen all this year's produce anyway.

Fortunately I was saved by one of the lovely people on a forum I post on, who found this recipe for fabulous mini Christmas Puddings.  I've opted to make double quantities, so I can take some to work tomorrow as well.

  It looks fairly simple, so I reckon I can knock it together whilst having a large glass of wine and celebrating that tomorrow is my last day in my current job.  I fail to see anyway that this plan can go wrong.

Mini Christmas Puddings
75g unsalted butter
100g plain chocolate
75g raisins
2tbspn brandy, port or orange juice
1x300g ready made ginger cake
To decorate:
150g ready to roll icing The picture in that link does NOT look like ready roll icing, so I'm going to melt white chocolate over the top instead.
Green and red food colouring I've bought icing pens instead, with my amazing art skillz this can't go far wrong...
Method:
  • Soak the raisins in all of the brandy/port/orange juice; whichever one you chose, for a half an hour I'm soaking the raisins in Christmas Pudding Vodka, for that extra Christmassy taste.
  • Melt the butter and chocolate together either over a pan of simmering water or in a microwave
  • Stir in the raisins and crumble in the ginger cake At this stage I realise that I have bought Golden Syrup cake rather than ginger cake.  Because I am half way through a bucket of wine and NOTHING on god's earth is entice me back to the Supermarket now, I throw in the cake and teaspoon of ground ginger and try to pretend that nothing has happened.
  • Mix well and leave to cool slightly
  • Place in Fridge for an hour to firm and then roll into bite sized balls 
 Ok, at this stage they look slightly like a giant rabbit has crapped on the baking tray, but they taste amazing.  The Christmas Vodka really adds an excellent depth to the cake mix.
  • Colour 1/3 of the icing green and roll it out on a worktop dusted with icing sugar
  • Cut into holly leaves (use a cutter/knife)
  • Colour 10g of the icing red and roll into berries
  • Roll out remainder of white icing and cut out 10 circles and place these on the top of each of the puddings.
  • Add the leaves and berries...and Serve!!!!! 
I ignored all the rest of the steps and instead I melted some white chocolate and left it to cool.  Then I dropped some of the still liquid chocolate on the top and let it dribble down the sides, to create an icing effect. Then I used the icing pens to squiggle on some green holly leaves and dot on some red berries.


Now these may not be the most artistic things that I've ever made in my life.


But they taste amazing.

And for a Wednesday night in a bit of a panic and half drunk, they're not that bad.

Hopefully they'll keep my lovely housemate from feeling abandoned as well.
Sunday, 18 December 2011

Lazing on a Sunday Afternoon.

I've had a lovely weekend.  Yesterday I was taken to the Gainsborough exhibition at the Holburne Museum in Bath, the pictures were gorgeous and it's well worth a visit.  Just as exciting, Bruce Munro's Field of Lights is in the grounds at the minute.  We were there just as it turned dark, and it's really spectacular.  It makes me wish I were better at photography.  I must try and persuade Simon and Charlie to come back with me before it closes on 8th January and take some pictures.

Today however, I had nothing on and so I spent the afternoon in the kitchen, cooking two of my favourite things, finishing off a few bits and pieces and wrapping up some Christmas presents.

This is one of the very best things that you can do with a leg of lamb; it's totally simple and hassle free, there's no measuring or weighing or worrying and takes care of itself once it's in the oven.  All you need is some time.

Take your leg of lamb, run it under the tap and wash it well, then place in a heavy bottomed casserole dish with some olive oil and brown.  I say "place", my leg of lamb was on the large side so it was more a case of "force it in the best you can".

Brown the meat all over and then drain off any excess oil.


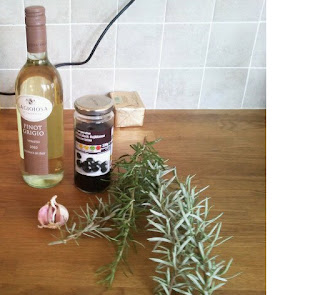
Then take a bottle of white wine, six cloves of garlic, a large handful of black olives and a good bunch of rosemary.  Fling all of these in the casserole dish (yes the WHOLE bottle of wine), put the lid on and stick it in the oven.  Cook for an hour at 160 and then reduce the temperature to 140 for another three hours.

Once it's done the lamb should fall apart.  The lamb's meltingly tender.  I usually serve it with new potatoes roasted in olive oil and sea salt and some broccoli steamed in soy sauce.  Anything works though.

While I was in the kitchen, and because the lamb is hardly labour intensive, I knocked together a batch of brownies.  Good brownies seem to be really hard to find at the minute.  They're either too dry or seem to involve melting large quantities of chocolate in a bain marie.  Yawn.  This recipe is awesome and idiot proof.  I've been making it for years and it always goes down well.


Chocolate Brownies
  •  75 g flour
  • 40g cocoa powder
  • 1/2 teasp baking powder
  • 125g butter
  • 225g brown sugar
  • 1 teasp vanilla essence
  • 2 large eggs beaten
Sift together the flour cocoa powder and baking powder.  Cream together butter and sugar until fluffy, then beat in vanilla essence and eggs.  fold in flour mixture and add to a lined tine (20cm/8inch square)  put into a pre-heated oven at 180 c bake for 30 min or until firm.

I made double quantities, so I could take some to work tomorrow.  I also threw in a large handful of frozen raspberries and white chocolate chips.   This is brilliant combination, but it also works well with mini marshmallows or fudge pieces.

Saturday, 17 December 2011

Top Secret Pâté

It's times like this that I am glad that no one other than the weirdo with IE reads this blog (yeah, I can see you; get a better browser), because my mother would absolutely kill me if she thought I was publishing her top secret Chicken Liver Pâté recipe on the Internet.  Getting her to give it to me was hard enough.

Knowing my mother, she's probably nicked it from somewhere else.  (Madly trying to justify this breach of trust)

Anyway, this Chicken Liver Pâté has become legendary in our family.  Each year my mother makes it for Christmas and we fight over who gets some to take home with them.  This year I have volunteered to make the whole family's supply to try and cut down on the work for my Mum.  

I'm making four times the amount of this recipe. 

Chicken Liver Pâté
4oz Butter 100g
1/2 onion
clove garlic
8oz chicken Livers 250g
2 tablsp brandy
1 teasp Dijon Mustard
Mixed spice
Seasoning


Melt 1oz butter and cook onion and garlic until soft not brown.
Add Chicken Livers  and cook 5-6 minutes turning once.  They should be just pink.  If they are cooked too long the pâté will be granular. This part always panics me.  What if I cook them too long? What if I wreck the pate? I usually resort to timing the cooking exactly and turning at three minutes.  This type of cooking doesn't come naturally to me.  I prefer to fling things in randomly and cook by eye.
Onions and livers into processor.  I'm forced to cook the liver in two batches because of the amount I am making.  The onions are moved to the processor with the first batch.
Rinse out the pan with the brandy, and add to the processor
Melt 2oz butter, add to processor.
Add mustard and mixed spice.


Process until smooth it does look pretty weird at this stage, piping hot meat paste.  Mmmmm 
.
   

 Split into small dishes.  I'm hoping that my sisters return the le creuset ramikins I've used.


Melt remaining butter and pour over top to seal.  Bay leaf and or peppercorns in butter for decoration.

I'm particularly smug, because the bay leaves that I used to top these with are from the bay tree in my garden.  Someone told me that bay trees were difficult to look after and that mine would be dead in a couple weeks.


Mind you that was two years ago and it was the same person who told me that planting rosemary outside my back door was a bad idea. That turned out ok too.

Thursday, 15 December 2011

Chicken soup for the soul?

When I'm ill I can guarantee that I'll want two things; a hug and enough chilli to clear my head.

I've had a miserable cold for the last two days and in the absence of hugs on tap, I decided to make chicken soup, a supposed metaphorical hug (ok, I know I;m stretching the analogy) and fill it full of chilli, so I could have both in one.

This is one of my very favourite soup recipes.  I have no idea where it came from as it's handwritten in my recipe book.  Normally things that I write in there have a friend's name attributed to them, this one doesn't so I assume I am about to plagiarise wildly.  Apologies in advance.

Thai Chicken Noodle Soup.
Start by poaching four chicken breasts (you can rejig quantities dependant on how many are eating.  I made enough for two this evening).
Boil a pan of water, throw in a handful of coriander, some black peppercorns, a pinch of sea salt and half an onion finely chopped.  Bring to the boil, add the chicken, cover and take off the heat.  Leave to poach for an hour.

Soup
The soup calls for the following
Pak Choi - There was none in the supermarket, so I made do with cabbage and leek combination.
250g egg noodles
2ltrs chicken stock
asparagus
90ml oyster sauce
1 1/2 tbs caster sugar
3 tbsp lime juice

To Serve 
Coriander leaves
Red chilli
spring onions
lime wedges

Split the pak choi between four bowls. Cook the noodles, drain and lay over the pak choi. Top these with a shredded chicken breast.

Bring the chicken stock to the boil and blanch the asparagus.  Lift out with a slotted spoon and add to the soup bowls.  Add the oyster sauce, lime juice and  sugar and stir through.  I like to add some chopped fresh chilli at this stage.

Ladle over the soup bowls and top with chilli, finely chopped spring onion and lime wedges.

Delicious and there's enough left over for lunch tomorrow.

Saturday, 10 December 2011

I named him Maud the Monkey.

Apparently vodka doesn't make a very good presents for small children, so I had to think of something else to make my goddaughter and new nephew for Christmas.  I've been thinking about sock monkeys for a couple of years.  Ever since I picked up some sock monkey mittens in Canada because they were the only things that would fit over my cast.  Apparently I'm not very decisive when it comes to committing to monkeys.

I eventually picked up a book on how to make them, it's possibly the most exciting thing that I have bought in AGES.  You can make not only sock monkeys, but pigs and owls and elephants and rabbits and crocodiles and loads of other animals.  Sock monkeys are fascinating, they originate from the Victorian Era and there are now actually Sock Monkey festivals to celebrate them.  Look!

So it takes two socks to make a monkey, some stuffing, buttons for the eyes, needle and thread and some scissors.

Turn the first sock inside out and turn it over so the heel of the sock is pointing up, then draw on the leg shapes and stitch them up using a back stitch, through both layers of the sock.


Then you cut out the leg shapes, turn the sock over and cut in a slit where you want the monkey's mouth to be.


Use this to turn the sock the right way out and then stuff the monkey using the toy stuffing.  Stitch up the slit using a blanket stitch.

Then take the second sock and turn it inside out as well.  Use this to make the arms, ears, tail and muzzle.  It's not particularly easy to explain where to position these parts so I have used my outstanding powerpoint skillz to create the below guide.  No mocking me.

Double stitch the outline of the arms, making sure not to sew up one of the ends so you can stuff them and turn them the correct way out.  Do the same with the tail, but sew all the way round the ears as you'll cut them in half afterwards.  Cut the toe off the end of this sock and sew it over the slit the you made in the monkey's head to make the muzzle.  Sew most of the way round, stuff the muzzle and then finish sewing it up.

Attach the arms and ears and sew on two buttons for eyes.


I like them quite a lot.  I am not convinced how suitable they are for a small child that is only a month old.  Perhaps I should keep them instead.

Oh.  I appear to have made a sock rabbit as well now.  I think I shall try an elephant next.

Christmas Spirits

Last year when I was making the Christmas packages, Merryn and I made chilli vodka.  To be utterly honest I think we overdid the chilli ever so slightly.  Simon and Charlie still have some left over which people were forced to drink as a penalty at a recent party.  

We made it by mincing up loads of chillies, dumping them into a bottle of vodka, taping the lid back on and popping it in the dishwasher for a couple of cycles.  And it was bloody hot.  The problem was we decided to 'artistically' garnish these with  some large red chillies dropped into the bottle.  We labelled it as chilli vodka, we told people it was chilli vodka, it wasn't technically our fault that people assumed that the chilli they could see was the only chilli in the vodka. 

Anyway, this year I thought I'd try something a little more palatable.  Something that potentially people wouldn't throw away as soon as they got home.  I've nicked this recipe for Christmas Vodka from my friend Abi.  She in turn stole it from Taste I think, where it was originally called Plum Pudding Vodka.


Christmas vodka
1 bottle (about 700ml) vodka
250g dark brown sugar
100g mixed peel
250g sultana
150g raisins*
grated rind and juice of 1 orange
1 tsp almond essence
6 cloves
2 cinnamon sticks
2 vanilla beans, split, seeds scraped
1/2 tsp nutmeg
1 tsp mixed spice


* I've always wondered what the difference is between raisins and sultanas.  Surely they're both just dried grapes? Apparently just different types of grapes.


Anyway, I got some strange looks wandering round Sainsburys clutching the largest bottle of own brand vodka that I could find.  I wanted to tell people that it was for making flavoured vodka, but I figured that would just look worse.


Endlessly classy.


Anyway, this is totally straightforward.  Stick all of the ingredients into a large bowl, cover them and leave for a week in the fridge, stirring occasionally.  Unfortunately I've been away from home lots since I put this together, so I didn't stir at all.  I also used vanilla paste rather than vanilla beans. 

After the resultant mixture has sat in the fridge for a week, strain it through a sieve and rebottle. You need to press down hard to force all of the liquid out of the mixed fruit.  I've bought small decorative bottles, but you can stick it back in the original bottle if you're just making it to serve at home.

The citrus oils and almond essence do leave some scum in the vodka once it's strained, but this is just an aesthetic irritant rather than being something to worry about.


It smells and tastes delicious, but the brown colour is somewhat worrying.  I've got some more ready to go in the fridge.

All hail the Lizard King

The company I work for at the minute is really big into their Christmas parties.  They tend to hold them in aircraft hangers, specially decked out for the occasion; they're fancy dress and themed.  The themes are always stupid.  Last year it was "Metropolis" this year it was "Regeneration".  The guys in RDD stop working for a month and just focus on building costumes instead, it's very competitive.

We never win anything, mainly because our costumes are always a bit shit.  This year we opted to go in black tie and to just use make up to create a lizard effect.  Tenuously themed.


This is a terrible picture of me, it looks like I have no neck or something, but the makeup shows up well in it.

The make up was actually really easy to do.  I started by popping in some black coloured contacts to create a beady eye effect.  I then took a black eyeliner and drew in the shape that I wanted to scale across my face.

I filled this in with the base colour (pale blue on me, green on Paul) and then, once this had dried I pulled some fishnet tights over my head and sponged black over the top to create the scale effect.  The only difficult bit about this was getting the tights off without smudging the paint.

I finished it off with a dab of glitter across my cheekbone.

Tuesday, 6 December 2011

What do you give the man who has everything?

We stopped having stockings at Christmas the same year that I got miniature bottles of vodka and flavoured condoms in mine.  Which was a shame really; they were just getting interesting.

The great thing about our stockings when we were kids was firstly that they really were socks, usually my dad's, so getting the presents out of them was really difficult and secondly that the whole family contributed to them.  After we'd been packed off to bed my parents, grandparents, great aunt and uncle sat up, getting rolling drunk and putting the wrong presents in the wrong stockings.

However, it turns out that my brother in law has never had a stocking.  So my little sister decided that we're going to do one for him.  And of course we all have to put something in the stocking.  I've been ignoring this for as long as possible, but as I really quite like my brother in law I decided to make him a little something, using one of both our favourite materials.


It's a lego cufflink box!

Oh, ok.  I cheated.  I bought a kit, but it's brilliant.

Confessions in Chili


I tried out some of the chili jam I made for Christmas with a roast dinner on Sunday.

And although it tasted excellent, the consistency wasn’t right.  It was far too liquid.  Turns out I did break it by stirring it too early. 

I was forced to remake it last night.  And this time, I accepted that I know absolutely NOTHING about jam making and followed the recipe to the letter with regards to stirring.  I boiled it for twice as long as the recipe called for, as it didn’t appear to be thickening – and not at all because I was busy talking to Suzy and lost track of time. 

Anyway, the resultant mixture was of the correct consistency once it had cooled down and I now have some proper chilli jam.

And, I managed not to get any of the chilli/pepper mixture on my face this time.  I went one better.  I used the spatula that I scraped the chilli out of the food processor with to quickly stir the stir-fry I was making at the same time as the jam and promptly burnt the inside of my mouth.

Sunday, 4 December 2011

Bets to win

It has been a long week.  I've run a two day conference, missed two nights sleep, drunk far too much and finished it up with a day working in London yesterday.  I hate London quite a lot by the way.  I get lost, I get in people's way, I feel kind of helpless and out of my depth ALL the time I'm there.  I can make my way round Paris, Delhi and NY with no problems at all, but stick me in the middle of my own capital city and I become a gibbering wreck.

Anyway - I'm home for the afternoon and my trip back from London yesterday gave me some time to reflect on a bet I made a couple of weeks back.  Specifically that I could knock together a better salted caramel cheesecake than Somerfield.  Not such a terrifying prospect, but then the one from the supermarket was pretty damn good.

I started on this when I got home last night.  I used my usual cheesecake recipe as a starting point.  It's another good food one, and I've adapted it plenty of times in the past.  so I figure this should work out ok.

I made up the biscuit base as usual and once I had taken it out of the oven to cool, I mixed up some caramel dulce de leche with a teaspoon of rock sea salt.  I used pre-made dulche de leche;  an 18 hour day convinced me that cutting some corners would be ok on a trial run.  I spread the salted caramel onto the base, leaving an inch gap round the outside.  In my mind I envisage cutting into this cheesecake and the layer of caramel being a lovely gooey surprise at the bottom.  I suspect I am deluded.


I made up the cheesecake batter as per the recipe link, but used vanilla paste rather than vanilla essence.  This gives the cheesecake a wonderful speckled look as well as a richer taste. I spooned the cheesecake mix carefully into the gap between the caramel and the edge of the tin.  Once this was filled I then spooned the rest on top of the caramel, again carefully, in an effort to stop the caramel and cheesecake mixing in together.  I have no idea whether of not this will work or not.  Finally I swirled some dulche de leche over the uncooked cheesecake using my usual caramel-in-a-plastic-bag trick, as I still can't find my piping bags.


You can tell it was late at night as I haven't bothered clearing the work surfaces for the pictures.  I'd be ashamed of myself if I could be bothered.

I baked the cheesecake for 40 minutes at 180 and then a further 5 minutes as it still seemed a bit wobbly.  Then I gave up and went to bed.

This morning I am convinced that my artistic addition of the dulche de leche swirl was a bad idea.  The cheesecake has split slightly around the swirl.  I may leave this out of the next version of the cake.


I want to make up salted caramel shards to scatter across the top of the cake.  I have absolutely no idea how to do this, but a quick google tells me it shouldn't be that hard.

But of course, I'm totally wrong about this.  I take my eyes off the caramel for a few minutes to grab some coffee and promptly burn it.  And wreck a pan.  And am forced to start over again.  Even so the caramel doesn't really turn out as I had imagined.  I decide to scatter it on the cheesecake anyway and smear some more dulche de leche over the top and hope that it tastes good enough to ignore my presentation.


I guess that I'll find out this evening, as it's going over to the boyfriend's for dessert after his Sunday roast.  If I'm going to win this bet however I really need to figure out the presentation issues.

Sunday, 27 November 2011

Sweet treats and paying debts

Ok, so I'm nearly done for today.  I swear I don't usually make this much in one day; this is the effect that Christmas has on me.

So, I'm planning on making biscotti for part of the Christmas packages.  I found a rather excellent recipe on the BBC good food website which I planned on adapting slightly.  I am excited about this for two reasons.  The first is that I love biscotti, the second is that you can freeze this recipe half way through baking.  This means that I can freeze half and fully bake the rest to take to work and test on the boys there.  Win.


If it turns out ok, I'll need to make some more before Christmas, and then re-bake the frozen half, but it wasn't a particularly taxing recipe and I think looks fairly impressive.


I actually stuck fairly strictly to the recipe, except I cheated slightly by flinging everything in the food processor rather than rubbing it in by hand.  I also switched out the cherries for some cranberries.


Then comes the paying debt part of the post.  I have a big conference coming up at work next week, it's been thrown together at fairly short notice and further complicated by my boss being off work last week.  Finance have pulled me out of a hole by doing an extra payment run to get all my suppliers paid in time.  So to say thank you, I've knocked together some caramel cupcakes for them.

I've used a Hummingbird bakery recipe. I love the Hummingbird bakery cookbooks, I wish I was better at making up recipes rather than following other peoples.  Again, I cheated slightly by flinging everything in the food processor.


No laughing at my ancient food processor.  My Grandpa gave it to my Granny many years ago, it's been around longer than I have and I can't bear to throw it out however much I would like a brightly coloured Kitchenaid mixer.


Things were going swimmingly well, until it transpired that I had run out of icing sugar.  Something is always going to go wrong at this time in the day for me.  A quick trip the shop later and I'm all done.  I particularly enjoyed decorating these with the *ahem* artistic squiggles of caramel.  I couldn't find my piping bag, so I used a plastic freezer bag with the corner snipped off.  It shows.

If life gives you lemons...

Next up for the Christmas packages is Lemon Curd.

I'm using a Nigel Slater recipe.  I've always like Mr Slater, not because his recipes are good (which they are) but because of the way my mother talks about him.  "Well Nigel says...." she'll start, as we discuss the dinner she's just cooked.  She talks about him confidentially, as if they were best friends.

My mother I should add at this point is an outstanding cook.  If I ever grow up I want to be able to cook like her.

Mr Slater's recipe makes two small jars and I need four, so I am doubling up the quantities.  I can't see that this will present any problems, on a recipe I've not made before.

Lemon Curd

Most lemon curd recipes instruct you to stir the mixture with a wooden spoon. I find that stirring lightly with a whisk introduces just a little more lightness into the curd, making it slightly less solid and more wobbly.

Makes 2 small jam jars
zest and juice of 4 unwaxed lemons It turns out that 8 lemons is rather a lot to zest and juice.  I immediately lose concentration and zest part of my thumb off.  I decide to sulk, put on some loud music and have a diet coke break before carrying on.  Obviously this is to prevent me bleeding into the lemon curd and NOT because I am a massive child.
200g sugar
100g butter
3 eggs and 1 egg yolk

Put the lemon zest and juice, the sugar and the butter, cut into cubes, into a heatproof bowl set over a pan of simmering water, making sure that the bottom of the basin doesn't touch the water. Stir with a whisk from time to time until the butter has melted
.
Mix the eggs and egg yolk lightly with a fork, then stir into the lemon mixture. Let the curd cook, stirring regularly, for about 10 minutes, until it is thick and custard-like.  It should feel heavy on the whisk. I cooked mine for slightly longer as I've doubled the quantities.  I have no idea if this is a good idea or not.  I also use this time to skim out any pips that escaped into the mixture earlier.

Also I am not really sure what he means by "Heavy on the whisk", but it looks ok when I take it off the heat to cool.
  
Remove from the heat and stir occasionally as it cools. Pour into spotlessly clean jars and seal.

This actually made three and a half jars, which is fine as the forth was really only for quality control purposes.  I shall hand the half jar over to Phil to see what he makes of it.  As with the chili jam, I used wax paper circles before putting the lids on.  Hopefully this will prevent the whole lot rotting before Christmas comes.  I also managed to break a jar while sterilizing them.

Christmas is coming - bah humbug etc

So it may still be November, but in my family we have to make our Christmas presents, which means I am forced to think about it slightly earlier than I would otherwise like to.  So before 24th December.

Now let's get something straight, I actually quite like Christmas.  I just don't think it should start until maybe 20th December.  And of course the shops have been full of red glittery, jumbo chocolate boxes since at least late August.  By the time it actually gets here I have mild Christmas fatigue.  Which makes it look like I don't like Christmas, which by that stage I don't. 

Anyway - I'm starting my first Christmas present project.  I am going to make chili jam as part of the family's Christmas packs.  This isn't a particularly original idea, my lovely friend Charlie made this last year.  But it was delicious and (she claims) idiot proof, so I'm giving it a whirl.

I'm using Nigella's recipe, it looks fairly straightforward - what can possibly go wrong?

  • 150g long fresh red chillies.
  • 150g red peppers, cored
  • 1kg jam sugar
  • 600ml cider vinegar
  • 6 x 250ml sealable jars, with vinegar-proof lid, such as Kilner jar or re-usable pickle jar  WTF???  Seriously I just noticed this!  What is a vinegar proof jar? I suspect it is not the honey jars that I bought.  Am I going to poison my entire family by not using kilner jars?
Serves: Makes approx. 1.5. Litres
  1. Sterilize your jars and leave to cool.
  2. Put the cut-up chillies into a food processor and pulse until they are finely chopped. Add the chunks of red pepper and pulse again until you have a vibrantly red-flecked processor bowl. I rammed them both in at the same time.  What could possibly go wrong with this?
  3. Dissolve the sugar in the vinegar in a wide, medium-sized pan over a low heat without stirring. Hold on - without stirring?  That doesn't sound right, what if it burns at the bottom and wrecks my pan?  It doesn't look right either....
 
4. Scrape the chili-pepper mixture out of the bowl and add to the pan. Bring the pan to the boil, then leave it at a rollicking boil for 10 minutes.
 
5. Take the pan off the heat and allow it cool. The liquid will become more syrupy, then from syrup to viscous and from viscous to jelly-like as it cools. I notice that nothing is mentioned about the bright red scum that's currently floating on the top of my chili jam.  I wonder if I should skim it off as it seems to contain all the chili seeds that my slapdash prep has missed.  


I think it will probably go away on it's own if I ignore it for long enough.  Yes, that seems like a sensible option.  I am going to go and have a coffee while this cools down.

6. After about 40 minutes, or once the red flecks are more or less evenly dispersed in the jelly (as the liquid firms up, the hints of chili and pepper start being suspended in it rather than floating on it), ladle into your jars. For the love of god DO NOT DO THIS.  Decant the jam into a measuring jug and use this to pour into the jars.  There was extensive spillage before I decided on this course of action.

7. If you want to stir gently at this stage, it will do no harm. Then seal tightly. Stir now?  I stirred it when I took it off the heat!  When I was debating what to do about the red, seed containing scum.  Is my premature stirring going to break the chili jam?


Well it kind of turned out as a success.  It looks ok, the bit I tasted, tasted ok.  I'll see whether or not anyone dies over Christmas after yet again, failing to properly read the recipe before starting a project.  I'm just waiting for the jam to cool so I can see if it sets properly, while I start on the next part of the Christmas project.


Also, if you're going to try this, wear gloves when prepping the chilies.  Or at the very least wash your hands afterwards.  I didn't, as usual, and rubbed my nose. Which now hurts.  Lots.